Migrating from Ghost to Hugo
Why migrate to Hugo?
Why migrate golangbot.com from Ghost to Hugo is the first question that will pop in your mind when you read this post. golangbot.com is 6 years old and it has been powered by Ghost since its inception. Ghost has stood the test of time and it has served me well. Why migrate to Hugo then? Well I have my own reasons.
Ghost doesn’t support SQLite anymore
Ghost has been supporting SQLite and MySQL as the backend store. I preferred using SQlite since it’s file based and doesn’t require dedicated compute like MySQL. SQlite was able to handle the traffic received by golangbot.com without any issues. With the release of Ghost 5.0, there is no official support for SQlite in production. I could have migrated to MySQL, but it means I have to either self host it in a dedicated VM or use a hosted provider both of which cost money. I make $0 from golangbot.com and I can’t afford to switch to MySQL. This was the major driving factor to migrate to Hugo.
Write in .md and preview the contents locally
Hugo supports writing blog posts in .md and visualizing them locally without publishing. The blog posts can be version controlled using git. This was never possible with Ghost. In Ghost, one has to go the admin panel to create a blog post. There was no version control possible. Technically we could have a version control on the SQlite DB but it was not as easy as version controlling a .md file.
There is no need for a dynamic website
golangbot.com is a static blog and there is no need for a dynamic content management system like Ghost. No dynamic CMS means less overhead maintaining the blog. A static file server is good enough to serve the static web pages generated by Hugo. I choose Caddy to act as the file server to host the static web content generated by Hugo(more on Caddy later)
Editing themes in Hugo is a piece of cake
Hugo has a amazing override model where editing themes is super easy. To make it simple, it works like this. If a theme has a file named sidebar.html, you can copy this file to a specific location and make the changes needed. Hugo will now start using the custom sidebar.html to generate the static website instead of the original sidebar.html from the theme. Where this shines is, the source of the theme need not be changed to modify the theme. This makes pulling the latest code changes from the theme from git a piece of cake. There will be no merge conflicts!
Steps in migrating a blog from Ghost to Hugo
Now that we have discussed the reasons to migrate from Ghost to Hugo, let’s see how this can be done with zero downtime. I don’t have a million dollar budget to pull off this migration with zero down time 😄. My budget was one digital ocean $12 droplet (this is addition to the current $12 linode on which golangbot.com is hosted) and I wanted to try migrating my website with zero downtime and I was able to achieve it. Please continue reading to know more about how I did this.
Exporting the contents of the the existing Ghost blog
The first step in the migration is to export the contents of the existing Ghost blog to json format. This feature is available in the admin panel. Login to the Ghost admin panel and proceed to Settings -> Labs to export the existing blog posts in json format.
Creating the Hugo website from the exported Ghost json
I used ghostToHugo to create the Hugo static website from the exported Ghost json. It worked pretty well without any issues and I highly recommend ghostToHugo. The following command creates a static Hugo site from the Ghost json file.
ghostToHugo -p ~/golangbot export.json
The above command will create a new Hugo website in the golangbot folder in your home directory.
Migrating images
Unfortunately ghostToHugo will not migrate the images and this has to be done manually. The images in the ghost blog can be found at /your-ghost-path/content/images. These images had to be downloaded and placed at path ~/golangbot/static/content/images for Hugo to use the images correctly.
Choosing a Ghost theme
The next step in migrating a website from Ghost to Hugo is to select a theme. I wanted a theme that was simple. I browsed themes.gohugo.io and found many themes that were good and finally settled with hugo-clarity since it was simple and had all the features I need such as a Author bio, featured posts and social sharing out of the box.
Installing the theme and running the website
The final step is to install the theme and to test whether our Hugo website is working.
1cd ~/golangbot
2git submodule add git@github.com:chipzoller/hugo-clarity.git themes/hugo-clarity
3echo "theme = 'hugo-clarity'" >> hugo.toml
4hugo server
The above set of commands will start Hugo’s own web server and will serve the static website. You will see a output similar to the following.
 1                   | EN
 2-------------------+------
 3  Pages            |  76
 4  Paginator pages  |  10
 5  Non-page files   |   0
 6  Static files     | 149
 7  Processed images |   0
 8  Aliases          |   4
 9  Sitemaps         |   1
10  Cleaned          |   0
11
12Built in 178 ms
13Environment: "development"
14Serving pages from memory
15Running in Fast Render Mode. For full rebuilds on change: hugo server --disableFastRender
16Web Server is available at http://localhost:1313/ (bind address 127.0.0.1)
17Press Ctrl+C to stop
If you visit http://localhost:1313/, the new Hugo website must be up and running!
Generating the static website
Running the hugo command now will generate the static website along with all the static assets in the public folder.
This is the folder that must be served by our Caddy file server.
Zero down time migration
Now that we have the static website ready, the next challenge is to migrate it with zero downtime and minimum budget. I budgeted for one additional digital ocean $12 droplet in addition to the existing $12 linode on which golangbot.com was running already.
The following are the steps I followed to achieve zero downtime migration.
- Spin up a new Digital Ocean droplet
- Using Caddy with existing TLS certificates to serve the new static website
- Change
/etc/hostsfile locally to point to the public IP of the digital ocean droplet - Test golangbot.com
- Changing the
AandAAAADNS records to point to the new Hugo website and switching on automatic TLS in Caddy
Let’s take a look at these steps one by one.
Spin up a new Digital Ocean droplet
This step should be fairly straightforward and I would no go into much detail. I created a new DO droplet using their UI. Please visit https://www.digitalocean.com/products/droplets if you need more help to create a droplet.
Using Caddy with existing TLS certificates to serve the new static website
The existing golangbot.com website runs on nginx and I did not have much issues with nginx. One regret was I was never able to get automatic SSL renewal working reliably using certbot. I am not sure if it’s just me or if this a known issue but I couldn’t get it to work reliably. Caddy provided automatic TLS certificate renewal out of the box and hence I decided to replace nginx with Caddy. This also meant I did not want to run certbot since the automatic TLS certificate renewal is taken care by Caddy.
Please visit https://caddyserver.com/docs/install to learn how to install Caddy. https://caddyserver.com/docs/quick-starts/static-files has information about how to use Caddy as a file server.
There is a problem with enabling automatic TLS right away in Caddy. I wanted to test my website with https before launching to ensure that there are no issues like broken webpages. I also wanted to ensure that the new Hugo website is not accessible publicly before testing is 100% complete. To test the website without making
it available publicly, the A and the AAAA DNS records cannot be changed to point to the public IP of the Digital Ocean droplet. If these records are not changed, then Caddy will not be able to request TLS certs automatically. This is better explained by the TLS cert request process below.
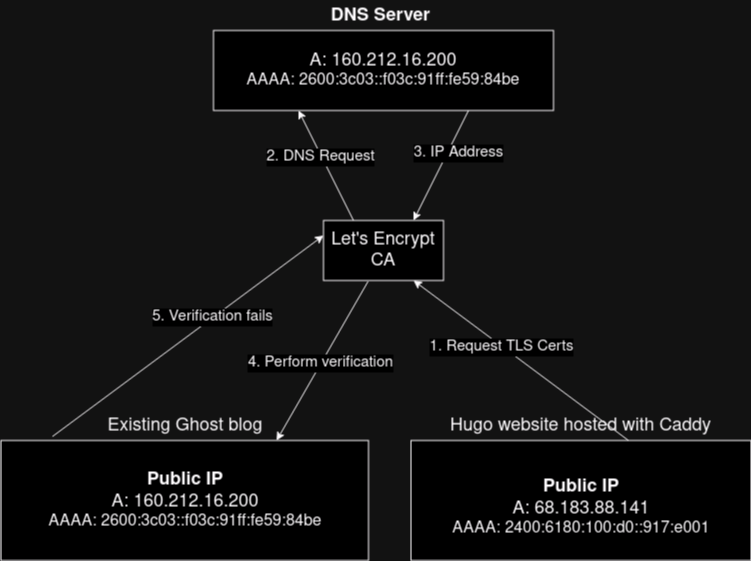
As explained in the diagram above, the existing A and the AAAA DNS records will point to the Ghost blog and the domain verification will fail. To workaround this, I decided to disable automatic TLS in Caddy and use the existing TLS certificates for testing the website. This can be achieved by the following Caddyfile.
1golangbot.com {
2	root * /path/to/static-hugo-site
3	encode gzip
4	file_server
5      tls /path/to/fullchain.pem /path/to/privkey.pem
6}
/path/to/static-hugo-site should point to the public folder which has the static website generated by Hugo.
/path/to/fullchain.pem and /path/to/privkey.pem are the paths to the already existing TLS cert and private key of golangbot.com. If the tls key is present in the Caddyfile, then Caddy will disable automatic TLS and use the provided TLS cert and key. There is still one more step needed before we can test golangbot.com with https and that is changing /etc/hosts file locally.
Change /etc/hosts file locally to point to the public IP of the digital ocean droplet and test golangbot.com
As we already mentioned, the DNS server has the IP address of the existing Ghost blog. I wanted to test the new Hugo blog completely before launching. This means that
changing the A and the AAAA record in the DNS server is not possible since this will allow the new website to be publicly available to everyone. A simple solution I found to this problem was to hard code the IP of the new Hugo blog in
the /etc/hosts file. This way, when accessing golangbot.com locally from my PC, it will point to the new Hugo blog and I can start testing the new version of golangbot.com!. I added the following entry to my /etc/hosts file.
68.183.88.141 golangbot.com
The above entry ensures that golangbot.com resolves to 68.183.88.141 when it is being accessed from my PC. As you would have guessed by now, this is the public IP of the digital ocean droplet hosting the new Hugo website. Thus I was able to access golangbot.com for testing without making it available publicly.
Testing golangbot.com
Now that I can access the new Hugo based golangbot.com, I extensively tested it for broken pages, broken image links and formatting. Please let me know in the comments section if you would like to know more about how I automated this. I can write a separate blog post on this.
Pointing the A and AAAA DNS records to the new Hugo website and switching on automatic TLS in Caddy
After I was satisfied that the new Hugo website is working without any issues, there were a couple more steps remaining to complete the migration. The first one is to change the A and AAAA records in my domain registrar. golangbot.com is registered using https://www.whois.com/ and their DNS panel looks like this.
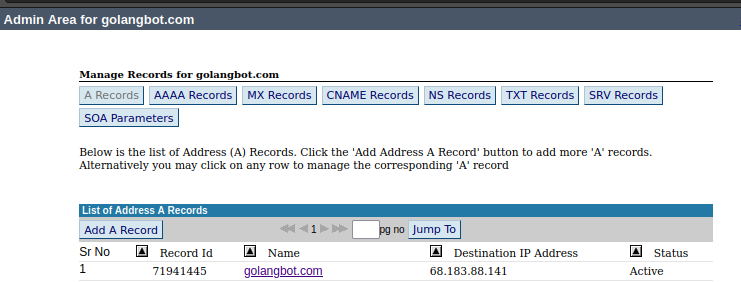
I believe it should look similar for other domain name registrars like namecheap, godaddy, etc. I changed the A and AAAA records to point to the IP address of the digital ocean droplet. Now that the IP address is changed, we can enable automatic TLS in Caddy. But before doing that, we need to ensure that the IP address change is propagated successfully to all root DNS servers. This can be done using a website like https://dnschecker.org. This website will display the IP address of a website in all the root DNS servers. We must wait for the IP address to be propagated to all DNS servers. After the DNS propagation is complete, the last step is to enable automatic TLS renewal is Caddy. This requires removing the tls key from the Caddyfile. The updated Caddyfile with automatic TLS renewal enabled is provided below.
1golangbot.com {
2	root * /var/www/golangbot
3	encode gzip
4	file_server
5}
After the above change is done, golangbot.com will point to the new public IP and it will also have automatic TLS renewal enable. That’s about it for migrating golangbot.com from Ghost to Hugo.
In addition to the migration from Ghost to Hugo, I also migrated from Disqus commenting engine to remark42 and replaced google analytics with cloudflare analytics. These changes will be covered in the upcoming articles. I hope you enjoyed reading. Please leave your feedback and comments. Have a great day.
