Defer
Welcome to tutorial no. 29 in Golang tutorial series.
What is Defer?
Defer statement is used to execute a function call just before the surrounding function where the defer statement is present returns. The definition might seem complex but it’s pretty simple to understand by means of an example.
Example
 1package main
 2
 3import (
 4	"fmt"
 5	"time"
 6)
 7
 8func totalTime(start time.Time) {
 9	fmt.Printf("Total time taken %f seconds", time.Since(start).Seconds())
10}
11
12func test() {
13	start := time.Now()
14	defer totalTime(start)
15	time.Sleep(2 * time.Second)
16	fmt.Println("Sleep complete")
17}
18
19func main() {
20	test()
21}
The above is a simple program which illustrates the use of defer. In the above program, defer is used to find out the total time taken for the execution of the test() function. The start time of the test() function execution is passed as argument to defer totalTime(start) in line no. 14. This defer call is executed just before test() returns. totalTime prints the difference between start and the current time using time.Since in line no. 9. To simulate some computation happening in test(), a 2 second sleep is added in line no. 15.
Running this program will print
Sleep complete
Total time taken 2.000000 seconds
The output correlates to the 2 second sleep added. Before the test() function returns, totalTime is called and it prints the total time taken for test() to execute.
Arguments evaluation
The arguments of a deferred function are evaluated when the defer statement is executed and not when the actual function call is done.
Let’s understand this by means of an example.
 1package main
 2
 3import (
 4	"fmt"
 5)
 6
 7func displayValue(a int) {
 8	fmt.Println("value of a in deferred function", a)
 9}
10func main() {
11	a := 5
12	defer displayValue(a)
13	a = 10
14	fmt.Println("value of a before deferred function call", a)
15}
In the program above a initially has a value of 5 in line no. 11. When the defer statement is executed in line no. 12, the value of a is 5 and hence this will be the argument to the displayValue function which is deferred. We change the value of a to 10 in line no. 13. The next line prints the value of a. This program outputs,
value of a before deferred function call 10
value of a in deferred function 5
From the above output it can be understood that although the value of a changes to 10 after the defer statement is executed, the actual deferred function call displayValue(a) still prints 5.
Deferred methods
Defer is not restricted only to functions. It is perfectly legal to defer a method call too. Let’s write a small program to test this.
 1package main
 2
 3import (
 4	"fmt"
 5)
 6
 7type person struct {
 8	firstName string
 9	lastName string
10}
11
12func (p person) fullName() {
13	fmt.Printf("%s %s",p.firstName,p.lastName)
14}
15
16func main() {
17	p := person {
18		firstName: "John",
19		lastName: "Smith",
20	}
21	defer p.fullName()
22	fmt.Printf("Welcome ")
23}
In the above program we have deferred a method call in line no. 21. The rest of the program is self explanatory. This program outputs,
Welcome John Smith
Multiple defer calls are placed in stack
When a function has multiple defer calls, they are pushed to a stack and executed in Last In First Out (LIFO) order.
We will write a small program which prints a string in reverse using a stack of defers.
 1package main
 2
 3import (
 4	"fmt"
 5)
 6
 7func main() {
 8	str := "Gopher"
 9	fmt.Printf("Original String: %s\n", string(str))
10	fmt.Printf("Reversed String: ")
11	for _, v := range str {
12		defer fmt.Printf("%c", v)
13	}
14}
In the program above, the for range loop in line no. 11, iterates the string and calls defer fmt.Printf("%c", v) in line no. 12. These deferred calls will be added to a stack.
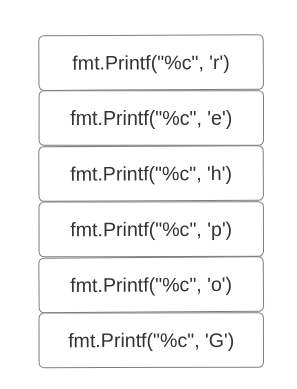
The above image represents the content of the stack after the defer calls are added. The stack is a last in first out datastructure. The defer call that is pushed to the stack last will be popped out and executed first. In this case defer fmt.Printf("%c", 'n') will be executed first and hence the string will be printed in reverse order.
This program will print
Original String: Gopher
Reversed String: rehpoG
Practical use of defer
In this section we will look into some more practical uses of defer.
Defer is used in places where a function call should be executed irrespective of the code flow. Let’s understand this with the example of a program which makes use of WaitGroup. We will first write the program without using defer and then we will modify it to use defer and understand how useful defer is.
 1package main
 2
 3import (
 4	"fmt"
 5	"sync"
 6)
 7
 8type rect struct {
 9	length int
10	width  int
11}
12
13func (r rect) area(wg *sync.WaitGroup) {
14	if r.length < 0 {
15		fmt.Printf("rect %v's length should be greater than zero\n", r)
16		wg.Done()
17		return
18	}
19	if r.width < 0 {
20		fmt.Printf("rect %v's width should be greater than zero\n", r)
21		wg.Done()
22		return
23	}
24	area := r.length * r.width
25	fmt.Printf("rect %v's area %d\n", r, area)
26	wg.Done()
27}
28
29func main() {
30	var wg sync.WaitGroup
31	r1 := rect{-67, 89}
32	r2 := rect{5, -67}
33	r3 := rect{8, 9}
34	rects := []rect{r1, r2, r3}
35	for _, v := range rects {
36		wg.Add(1)
37		go v.area(&wg)
38	}
39	wg.Wait()
40	fmt.Println("All go routines finished executing")
41}
In the program above, we have created a rect struct in line no. 8 and a method area on rect in line no. 13 which calculates the area of the rectangle. This method checks whether the length and width of the rectangle is less than zero. If it is so, it prints a corresponding error message else it prints the area of the rectangle.
The main function creates 3 variables r1, r2 and r3 of type rect. They are then added to the rects slice in line no. 34. This slice is then iterated using a for range loop and the area method is called as a concurrent Goroutine in line no. 37. The WaitGroup wg is used to ensure that the main function is waiting until all Goroutines finish executing. This WaitGroup is passed to the area method as an argument and the area method calls wg.Done() in line nos. 16, 21 and 26 to notify the main function that the Goroutine is done with its job. If you notice closely, you can see that these calls happen just before the area method returns. wg.Done() should be called before the method returns irrespective of the path the code flow takes and hence these calls can be effectively replaced by a single defer call.
Let’s rewrite the above program using defer.
In the program below, we have removed the 3 wg.Done() calls in the above program and replaced it with a single defer wg.Done() call in line no. 14. This makes the code more simple and readable.
 1package main
 2
 3import (
 4	"fmt"
 5	"sync"
 6)
 7
 8type rect struct {
 9	length int
10	width  int
11}
12
13func (r rect) area(wg *sync.WaitGroup) {
14	defer wg.Done()
15	if r.length < 0 {
16		fmt.Printf("rect %v's length should be greater than zero\n", r)
17		return
18	}
19	if r.width < 0 {
20		fmt.Printf("rect %v's width should be greater than zero\n", r)
21		return
22	}
23	area := r.length * r.width
24	fmt.Printf("rect %v's area %d\n", r, area)
25}
26
27func main() {
28	var wg sync.WaitGroup
29	r1 := rect{-67, 89}
30	r2 := rect{5, -67}
31	r3 := rect{8, 9}
32	rects := []rect{r1, r2, r3}
33	for _, v := range rects {
34		wg.Add(1)
35		go v.area(&wg)
36	}
37	wg.Wait()
38	fmt.Println("All go routines finished executing")
39}
This program outputs,
rect {8 9}'s area 72
rect {-67 89}'s length should be greater than zero
rect {5 -67}'s width should be greater than zero
All go routines finished executing
There is one more advantage of using defer in the above program. Let’s say we add another return path to the area method using a new if condition. If the call to wg.Done() was not deferred, we have to be careful and ensure that we call wg.Done() in this new return path. But since the call to wg.Done() is defered, we need not worry about adding new return paths to this method.
This brings us to the end of this tutorial. I hope you liked it. Please leave your feedback and comments. Please consider sharing this tutorial on twitter and LinkedIn. Have a good day.
Next tutorial - Error Handling
